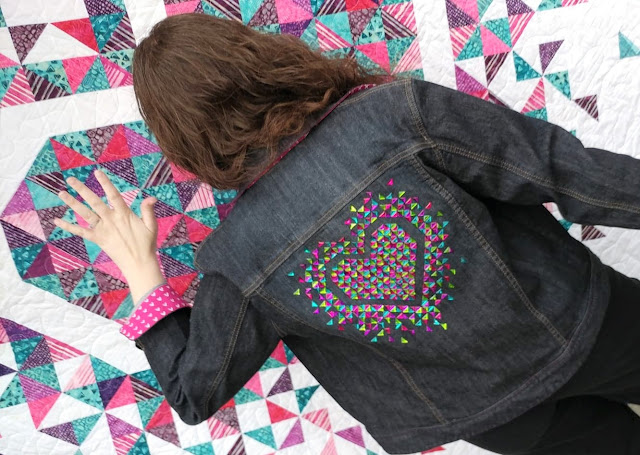
Almost immediately after I published the Exploding Heart quilt pattern, I had the idea to turn it into a denim jacket. And nine months later, it's done!!
This post contains affiliate links. As an Amazon Associate I earn from qualifying purchases.
If you're new here, hello! I'm Laura! I design quilt patterns, and I'm a self-proclaimed deal hunter! Be sure to join the popular Quilting & Sewing Deals Facebook group where I post sales, deals, and coupon codes from all around the web!
I can not express in words how much I love it! I'm so thrilled with how it turned out, and I want to wear it everywhere!!
Don't let the looks fool you - this is one of those projects that needs a "this took forever" tag!
This post contains affiliate links. If you make a purchase after clicking the inks, I may receive a small commission at no extra cost to you. As an Amazon Associate I earn from qualifying purchases.
If you're new here, hello! I'm Laura! I design quilt patterns, and I'm a self-proclaimed deal hunter! Be sure to join the popular Quilting & Sewing Deals Facebook group where I post sales, deals, and coupon codes from all around the web!
I spent months trying to source rhinestones. I could find every other shape in every color imaginable, but not a right triangle. I didn't give up though, and tried using different key words and searching different rhinestone websites every few days. I finally found some in the perfect size and shape - but they only came in clear.
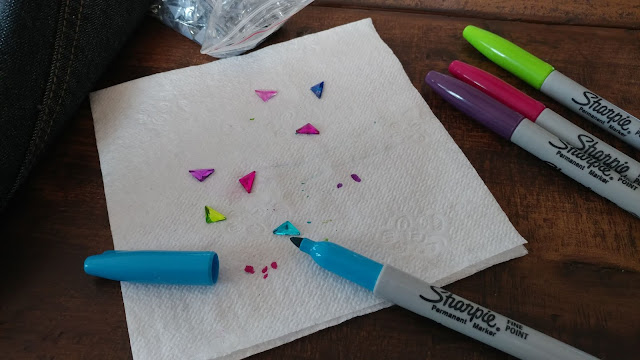
A few days later, I had an aha moment! Could I dye them?? I took to YouTube. I discovered that you could Sharpie them! I didn't do much research after that, because I already had Sharpies in lots of colors, and if it worked in a YouTube video, it must work for me!
I ordered the rhinestones straight from China. (I got them HERE.) I paid a few dollars extra for faster shipping (really, like $3 more!), but was skeptical that they would even arrive at all. To my surprise, I got a tracking number that was updated regularly as the package went from a warehouse in China, on an airplane to the US, and moved about the US on its way to me. I was shocked that it only took 15 days for me to get them!!
While waiting for the rhinestones to arrive, I started the hunt for a denim jacket. I used the measurements on the description of the rhinestones to calculate how big the finished design would be. Then armed with a ruler, I headed to my local Savers. There was a great selection of jackets the day I was there, but the back panel of most of them was too narrow for the design. There was only one that was a perfect candidate, so for $12.99, my plan continued to move forward.
Then it was time to see if Sharpies really would work. When sharing my plan, my dad mentioned that he used to "stain" glass insulators back in the 1970s, and he still had some of the glass stain. He immediately got out a box of a few dozen (vintage) bottles of "glass stain" in all colors of the rainbow! I had never heard of such a thing! We tried a few, and it did indeed color the rhinestones just as I wanted! But it was messy and hard to do on such small rhinestones.
The Sharpies created the same beautiful colors!
It was time consuming, as each rhinestone had nine facets, but the colors were exactly as I had wanted!
After letting the Sharpie dry for a bit, the color could still rub off. I could completely remove it if rubbed hard on a napkin, paper towel, or fabric. Some of the color came off when I touched them with my fingers. However, it wasn't much, and I decided I didn't need to wash the finished jacket, and I could take it off when sitting (like when driving). So being completely permanent wasn't a priority. Plus, I could always touch up the color on the rhinestones once they were on the jacket too.
I began coloring jewels in all my "spare time." It took hours. And hours. And probably a few more hours. (And wine too.)
Once all the jewels were colored, it was time to experiment again!
Oh! And thanks to my grandma's suggestion, I washed the jacket before the next step too! That should have been an obvious step, but I hadn't thought of it before she mentioned it! Thanks, grandma!
The rhinestones are hot-fix crystals. Meaning the back is a glue that is activated when heated. There is a tool that does it, but it is meant for round rhinestones. I decided to try Fabri-Tac glue instead. It says it's meant for glass and fabric, so it was worth a shot.
I drew a line down the center of the jacket with my favorite disappearing ink pen and got started!
The Fabri-Tac glue acts a bit like hot glue from a glue gun. It creates strings as it dries.
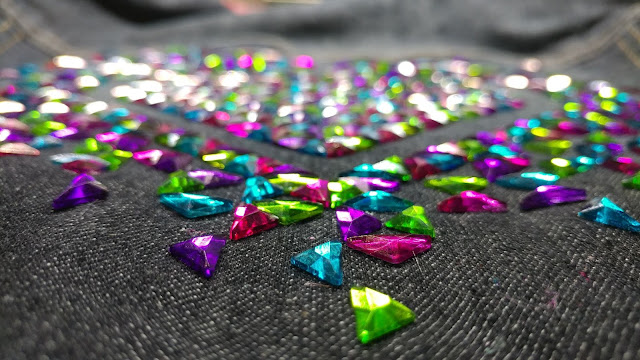
But it did hold the rhinestones in place, so I kept going!
I loved watching the heart progress, and I got more and more giddy about it as it neared the end!
Once all the rhinestones were in place, I let it dry overnight, then showed it off to my husband and kids the next morning. We all oohed and ahhed over it.
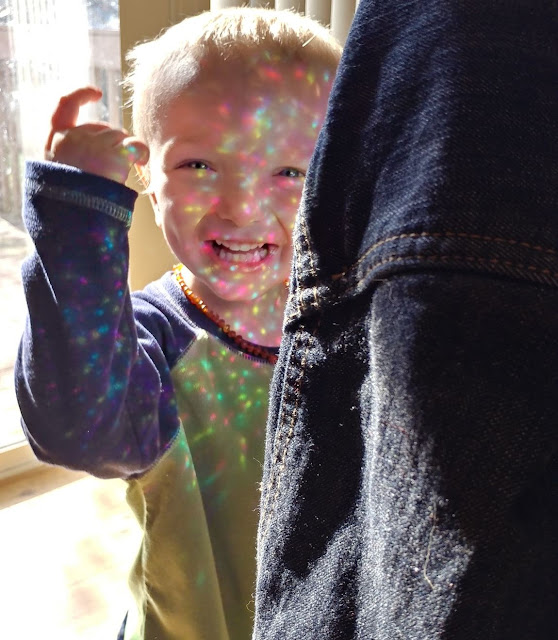
And then my 2 1/2 year old picked at a rhinestone, and it fell right off. I was going to need to experiment again.
I did some tests with spare rhinestones and fabric scraps, and decided that if I could activate the hot-fix glue on the back of the crystals, it would create a much stronger bond to the denim than the Fabri-Tac alone. I tried a test piece where I ironed from the back of the fabric. This did set the glue, but it also caused Sharpie to come off onto my ironing board and the crystal shifted a bit once the glue was melted. My husband and I brainstormed solutions, and decided to try his heat gun.
I did start with a test, and it worked really well! The crystals didn't shift when heated, the Sharpie didn't come off, and once cooled, the rhinestones were attached very tightly! There was just one drawback - in each of the tests I did, I scorched the fabric. I decided to do it on the jacket anyways. I worked in sections and was very mindful about how long I held the heat gun on each section. I didn't move the jacket at all once I started, and I let it sit overnight once I finished so it could cool.
I was very happy with how permanent the crystals felt now, so I was ready to tackle the next part of the project: replacing the collar, cuffs, and waistband fabric.
The denim jacket is a Coldwater Creek brand, and it had red/green/cream plaid flannel fabric on the collar, cuffs, and waistband. Well, and inside the pockets and on the yoke (I think that's what it's called??) inside the jacket too. But when wearing the jacket, the pockets and yoke aren't noticeable, so I decided they could stay.
I thought it would be simple. I would seam rip off the accent fabric, use it as a pattern to cut new pieces, then top-stitch the new pieces in place. However, once I started seam ripping, I discovered those same stiches were actually what was holding the collar, cuffs, and waistband on to the jacket!
Lots of deep breaths and photos so I could attempt reconstruction of it later, I continued on.
I knew I wanted to use hot pink for the replacement fabric, so I hunted through my stash and discovered the *perfect* fabric in my hoarded stash of Karen Lewis fabric. This print from her Blueberry Park collection has tiny hearts on it, and this project was deserving of my favorite fabric!
I used the old pieces as a guide, cut out new fabric, and stitched it on using 50wt Aurifil #1100. I would have used a heavier weight if I had it, because I LOVE the hot pink stitches on the denim! I think the 28wt would be perfect!
The replacement wasn't perfect, but it worked! I had to hand crank the section around the metal buttons (maybe there's a better name for those??) because it was a very tight fit there.
And I decided not to make the buttonholes functional, so just stitched around them with a straight stitch but didn't make them a proper buttonhole.
The hot pink stitches and peek-a-boo heart fabric was SO good!!
If I only used the heart section of the yardage I had, I would be about an inch short for what I needed. I had the same fabric in a couple different colors, and decided to use one of the other colors to make up the shortage. I added a section in the middle of the waistband for a fun accent. Fussy cut and pattern matched, of course!
I even added one of my EverSewn satin labels in the inside seam opposite the care instruction tag. I was claiming this one!
When the collar is down, there's just a hint of the hot pink showing through.
But pop the collar and roll the cuffs - and it's a party!
Here's a peek inside the jacket where I didn't remove the fabric. Yes, it would be much better with hot pink fabric there. But the hours.... Not worth it! Just like the jacket would be amazing with ALL hot pink stitching, but no. It does make me want to start from scratch with denim and hot pink thread though! I might add that to the "someday" list!
Have I mentioned how much I love it??
Like, I never want to take it off.
I love, love, LOVE it!!
I'm so excited to wear it to all my guild meetings and future quilty events!
If you see me out and about, I'm going to be in this jacket.
In case you want to make an Exploding Heart quilt, you can get the pattern in my Etsy shop. It does not include the directions for a denim jacket though. ;)
I absolutely loved the challenge of this project and am thrilled with the results.
I'm already planning the next one!
__________
If you liked this post, you may also like these:


Stunning! Love your perseverance in getting the crystals the right colors and to stick, too. And the pips of pink are perfect!
ReplyDeleteSandy
You are amazing! I love love love this, but would never have persevered. I am so glad you did...a project you couldn’t abandon but will get so much out of it. Congratulations on one more way to have an exploding heart!
ReplyDeleteFantastic! Thanks for such a detailed blog post too! Enjoy!!
ReplyDeleteWell done. You put a lot of work into, and it shows. Looking great.
ReplyDeleteSparkly beautiful!!!
ReplyDeleteFantastic sewing and gluing. I love how you made it happen and that your husband had lots of good ideas that really helped. I have one of those old insulators (bought at a craft fare in the '70s) that is painted red. I carefully wash the dust off sometimes.
ReplyDeleteI can see why you love this jacket so much - it’s beautiful. What an achievement
ReplyDeleteAwesome! Love it!! Covers it all!
ReplyDeleteWOW! Just wow. This is amazing, of COURSE you want to wear it all the time! I really appreciate seeing your entire process. And this is such a cool idea!
ReplyDeleteOmg to much work by put so amazing. Woman you have to much time on your hands! It’s beautiful but no way would I do this!
ReplyDeleteI've been sewing doll clothes for the past six years and have used Aleene's Ok to Wash it to glue bling on to garments. You can wash these and the crystals don't come off. Walmart used to carry it but I see that Amazon now carries it. Love this product and can verify that it does what it's advertised to do.
ReplyDeleteThanks for sharing all the amazing details of what it took to make this fabulous jacket.
ReplyDeleteBeautiful !!
ReplyDeleteThat should be your signature mark. It is Beautiful! Have you washed it yet?
ReplyDeleteI'm absolutely in love with this jacket and your exploding heart pattern.
ReplyDeleteWow! I am totally floored by this jacket. You did a fabulous job. Thanks for sharing the process.
ReplyDeleteWow,just wow! You're the woman!!! Kudos and hats off to you!! It's the coolest and I love your quilt pattern, too! Since I just live north of you, I'll keep my eye out for ya!
ReplyDelete