It was time to cross "rayon quilt" off my quilty bucket list!
This post contains affiliate links. As an Amazon Associate I earn from qualifying purchases.
If you're new here, hello! I'm Laura! I design quilt patterns, and I'm a self-proclaimed deal hunter! Be sure to join the popular Quilting & Sewing Deals Facebook group where I post sales, deals, and coupon codes from all around the web!
I've been collecting Island Batik rayon fabrics since my first year as an Island Batik ambassador in 2017. And recently, fellow ambassador Alison from Little Bunny Quilts sent me her stash of Island Batik rayon fabrics too! I had quite the assortment, but I had a really hard time trying to decide what to use together for a quilt.
I initially thought red and blue, but I asked my friend Leanne from Devoted Quilter via a Facebook message, and she picked the red, black, and gray. That was definitely the winning combination!
I had 2 1/2 yards of black, 2 yards of red, and one scarf of gray.
The red and black were regular 42" width of fabric, and the scarf measured 10" x 64".
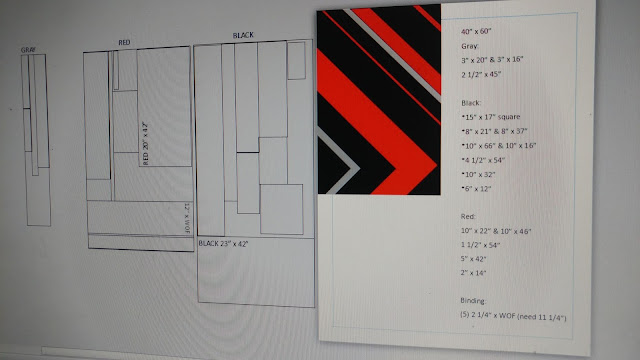
I spent a couple days at the "drawing board" trying to come up with a design that was:
1. Simple in construction and only squares/rectangles (no need to use a complicated design when I was working with a finicky fabric!)
2. Only three colors
3. Mostly red and black with just a scarf's worth of gray
and came up with this!
Did I mention that my *ideal* design would also use the rayon fabric for the backing and binding? I started the quilt math to see if it was possible...
According the my planning, it was indeed possible with just inches of wiggle room.
When it came time to cut the fabric, I realized just how much of a challenge this was going to be! The fabric was slick and had the hardest time staying put for cutting. I decided straight-ish cuts would be just fine.
Sewing the pieces together was another new adventure. Although the fabrics didn't fray as much as I expected, they were definitely slippery! I worked to line up just an inch or so in front of the needle at a time. The fabric was challenging to wrangle, and my seams were straight-ish. I also decided I would try to NOT press any part of the quilt. The rayon was working well without pressing, and I was too nervous about ruining the fabric by ironing it.
My design also presented a challenge as I had to "eye-ball" the placement of each additional strip. This caused the top to become a bit wonky.
I ignored it, and kept going. Once the pieces were sewn together, I trimmed all four sides to make it rectangle-ish.
Definitely rectangle-ish.
I sewed the leftover black, red, and gray pieces to make the quilt back, and knew pin basting and quilting it on my domestic would be a hot mess. Layering slippery fabric on top of slippery fabric just sounded like a disaster waiting to happen. The longarm would be the better choice.
I really wanted to use bamboo or silk batting to keep the drape of the fabric as light as possible, but I didn't have either in my stash. Instead, I chose my go-to batting - Hobbs 80/20.
I pinned the top in place to try and keep it as "square" as possible. Then I stewed about how to actually quilt it.
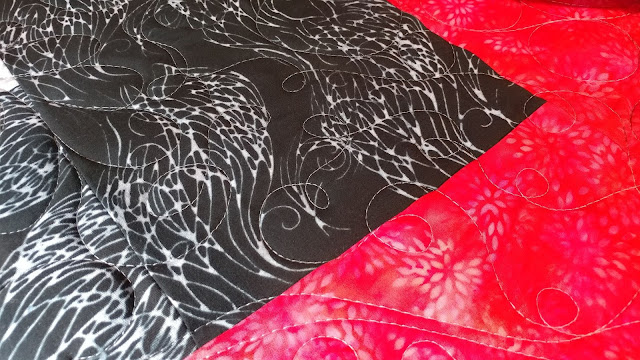
What I did know was that Aurifil 50wt #2610 Light Blue Grey would be the perfect thread choice.
But as for the quilting, that took a bit more time to decide. I didn't want to quilt it too densely as I thought that might affect the softness and drape of the finished quilt. But I wanted something more interesting than straight lines. I finally decided on jumbo graffiti quilting.
I quickly realized this was a great idea in theory, but when made jumbo, every imperfection that is normally hidden in the small scale of regular graffiti quilting was out on display with a megaphone. But I definitely wasn't going to unpick it and start over.
And the slippery-ness of the fabric meant the fabric shifted more than usual. This caused two puckers on the front of the quilt. Time to embrace all the imperfections. I kept going.
After quilting, I had a new challenge to tackle: how to square it up.
After much deliberation, I decided to use the straight horizontal seams on the back of the quilt as a guide, and ignore what it might do to the front.
I had just enough of the red rayon fabric to cut 2 1/4" strips for the binding and machine sewed it on. (I still never ironed it! Just folded it over and it worked without pressing!)
The final quilt is SO soft and SO cuddly. Like, think satin sheets. A bit cold to the touch and it just drapes like a melting popsicle.
Of course I see all the imperfections when I look at it.
But overall, they're barely noticeable.
The finished quilt measures just under 40" x 60" - exactly what I initially planned.
And I was able to use the red, black, and gray rayons for the top, back, AND binding!
I think this is a great summer quilt! It's really lightweight and that "cold to the touch" quality of the rayon fabric is definitely a plus in the heat!
This is my 108th quilt finish so far for 2019!
Would I make another rayon quilt? Maybe.
On Facebook and Instagram, I got some great suggestions for working with the rayon fabric including using a wash-away stabilizer, starch, and drinking lots of wine. All of which are definitely going on the list to try if there's a next time!
Linking up with Finished or Not Friday at Busy Hands Quilts, Can I Get a Whoop Whoop at Confessions of a Fabric Addict, TGIFF at Storied Quilts, Friday Foto Fun at Powered by Quilting, Beauties Pageant at From Bolt to Beauty, Peacock Party at Wendy's Quilts and More, Monday Making at Love Laugh Quilt, What I Made Monday at Pretty Piney, Modern Patch Monday at Modern Cologne Quilters, Moving It Forward at Em's Scrapbag, Design Wall Monday at Small Quilts and Doll Quilts, Colour & Inspiration Tuesday at Clever Chameleon, To-Do Tuesday at Stitch All the Things, Let's Bee Social at Sew Fresh Quilts, Wednesday Wait Loss at The Inquiring Quilter, Midweek Makers at Quilt Fabrication, and Put Your Foot Down at For the Love of Geese.
This post contains affiliate links. Clicking a link will NOT affect the purchase price.
__________
If you liked this post, you may also like these:


Enjoyed reading your adventures with Rayon, Laura! Nice to hear that the quilt does have redeeming qualities!
ReplyDeleteBrave woman, you. Had to chuckle when I saw the quilt before squaring. Hahaha. What a fun quilt, and what a fun story to go with it. Great to see the man behind the quilts too!
ReplyDeleteSeeing beauty in imperfection: wabi sabi. You are right in style, Laura! It's a beautiful quilt.
ReplyDeleteYou are certainly brave to make a quilt with unstabilized rayon. It looks so comfy.
ReplyDeleteFantastic finish. The fact that you were able to work through all the frustrations and keep going should make you feel so proud. A nice light weight summer quilt is great to have and I love the colors!
ReplyDeleteWow, that is awesome how you did that!
ReplyDeleteThat is crazy! I knew it would be slippery, but that was one heck of a challenge to undertake. I had been thinking of doing a jacket, but can’t find a pattern. I am impressed - again.
ReplyDeleteKudos to you for even trying! When I once sewed clothing, I found rayon a slippery widget, and wondered how they ever do it in a factory! This quilt is beautiful, and a great reward for trying the challenge of something new.
ReplyDeleteInteresting experiment. Excellent end result!! Challenge met (and exceeded.)
ReplyDeleteYou are a champ. I can not imagine wrestling with the rayon fabrics. You did a great job. Too bad you couldn't arrange a few more puckers and call it planned texture. But what blew me away is saying you've done 108 quilts so far in 2019. Good gracious gal! Don't you sleep? I've gotten several done this month but don't know how many quilts I've finished so far. But no where near 100 or probably even 50! Congratulations on trying something new and finishing 108 quilts.
ReplyDeleteLooks so cozy. I love your pattern with read, black and grey. Thank you for the process pics and the warnings on slipperiness and wonkiness :-) I haven't decided how to use my IB rayon but I've started thinking after seeing your quilt and Anja's top....
ReplyDeleteI think your quilt looks fantastic! You know, grain line might have been compounding the challenges inherent to the slippery rayon. If you cut your strips on the straight grain before piecing them diagonally, you have all kinds of bias stretch potential through the body of the quilt — you know, like what makes a slinky bias cut slip dress able to hug your curves! I’ll bet the rayon would be easier to work with if your pattern allowed you to keep straight grainlines. As for pressing, you should be fine on the synthetic setting. Definitely dressmakers would be pressing throughout construction if they were making a rayon dress. And starch is your friend while sewing fussy fabrics, washing out easily afterwards and restoring that soft, silky hand. I wish we had more options available in rayon — your quilt sounds as amazing as it looks!
ReplyDeleteThe quilt is gorgeous. I love the bold design.
ReplyDeleteThank you for linking at the Modern Patch Monday.
Wow, I almost feel stressed just reading this! I have delusions of making a rayon quilt, but now I am thinking it might be even harder than I expected, and I can't resort to a longarm. But the result looks amazing, so I won't rule it out just yet, much more thought required....
ReplyDeleteWow..don't think I would be brave enough to attempt this. But it looks amazing. The colours were the right choice.
ReplyDeleteGreat quilt design, but I'm not so sure about rayon. Definitely not one of my favorite fabrics
ReplyDeleteIt looks great. I can't believe how great after seeing the rough distorted figure after quilting. Just amazing. Question, your Gammill looks almost exactly like mine. Do you use a Towa gauge and if so, what number do you set your bobbin tension? I haven't been able to use 40wt Aurifil let alone 50wt. You sparked my curiosity.
ReplyDeleteGirl you are so adventurous! Like you I ignore the imperfections and celebrate the beauty! Thanks for linking up to Wednesday Wait Loss.
ReplyDelete