It's week 4 of the Exploding Heart quilt along! Last week, we finished sewing and trimming all the blocks, and this week we'll begin sewing the blocks into rows! Be sure to watch the video at the end of the post for some tips!
If you're just joining in, be sure to check out all of the quilt along blog posts:
This post contains affiliate links. If you make a purchase after clicking the links, I may receive a small commission at no extra cost to you. As an Amazon Associate I earn from qualifying purchases.
If you're new here, hello! I'm Laura! I design quilt patterns , and I'm a self-proclaimed deal hunter! Be sure to join the popular Quilting & Sewing Deals Facebook group where I post sales, deals, and coupon codes from all around the web!
Want to get the quilt along emails each week? Sign up here!
Week 4 / 6
This week we will sew the blocks into rows. The directions for this begin on page 8 of the pattern.
If you don't yet have the pattern, you can purchase it here.
Be sure to scroll down past the tips to watch this week's video!
I use a large table (like my dining room table), countertop, the floor, or design wall to lay out the blocks before sewing them into rows. My design wall is a flannel-backed tablecloth held up with painter's tape or push pins. It works great!
I lay out about three rows at a time just so none of the same fabrics in the colored triangles are touching. This is just my personal preference and attempt at being fairly random. Don't spend too much time placing the blocks. It's meant to be mixed up!
Once I have a few rows laid out, I use a numbered pin in the first block of each row to mark which row is which. (These on Amazon are a great option. You can use pins and numbered paper too!) Then I can stack the blocks in order and take them to the sewing machine.
You may have pressed your block seams open or pressed them to the side (either way is perfectly fine!). When sewing the blocks together, you might be sewing through several layers of fabric. Sew slowly and your machine should be able to do it just fine.
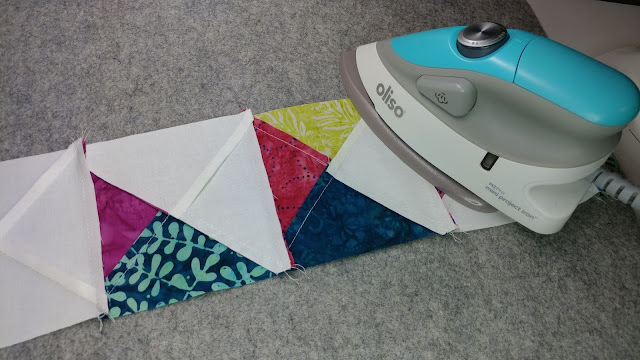
I like to press the seams in the odd numbered rows to the left and the seams in the even numbered rows to the right. This helps the seams to nest when sewing the rows together. If you prefer to press the seams open, go for it! (I'm using a turquoise Oliso mini iron and wool pressing mat.)
Once you've sewn all the rows and pressed the seams, you've finished this week's homework!
If you just can't wait to finish your quilt and want to sew the rows together, do it! You can finish early! There are no quilt (or quilt along) font!
Video
Check out this week's quick video!
**If the video doesn't load, you can watch it here: https://youtu.be/tc9eNLGxefo .
Homework
- Sew the blocks into rows. Refer to pages 8-9 of the pattern.
- If you want, share a photo of your rows all laid out so we can see how your quilt looks so far! Use #explodingheartquilt or #explodingheartQAL in the caption of your photo on Facebook or Instagram. On Facebook, you can share on your personal timeline, or you can share in a quilting group you're in! If the post is "public," then others sewing along will be able to find it and encourage you!
- Search for #explodingheartquilt or #explodingheartQAL on Facebook or Instagram, and like and comment on other posts to encourage those who are sewing along!
QAL Schedule
Week 5 - February 3rd - Sewing the top
Week 6 - February 10th - Quilting and finishing
Next week, I'll be sharing tips for sewing the rows into the quilt top!
Let's all quilt along!
__________
If you liked this post, you may also like these:


No comments:
Post a Comment
Thank you for visiting and for your comments! I try to reply to comments via email, so if you're expecting a response and don't hear from me, check if you're a no-reply blogger. Happy sewing!