This post contains affiliate links. As an Amazon Associate I earn from qualifying purchases.
If you're new here, hello! I'm Laura! I design quilt patterns, and I'm a self-proclaimed deal hunter! Be sure to join the popular Quilting & Sewing Deals Facebook group where I post sales, deals, and coupon codes from all around the web!
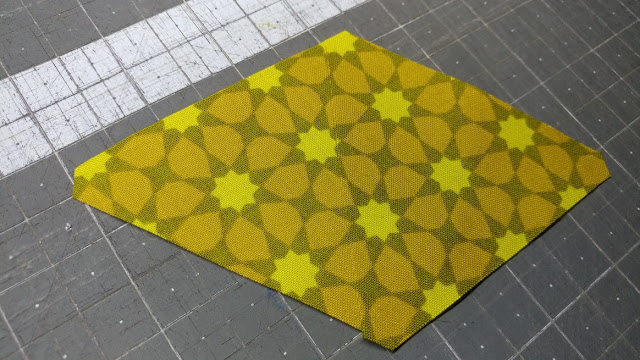
Be sure to get your End Game quilt pattern from Jemima's website. It includes the needed templates for making a large quilt and the mini quilt. Jemima even has acrylic templates you can buy to make it even easier to fussy cut!
So what is fussy cutting? Fussy cutting is when you cut the fabric in a way to cut around a design instead of cutting the pieces from strips or randomly. There are several types of fussy cutting.
One type of fussy cutting is to highlight an image from the fabric in the cut piece. This is often used when making I Spy quilts like these I made a few years ago (read more about them here and here).

A second type of fussy cutting is when identical pieces of fabric are cut to create kaleidoscope effect. This is used in "Stack 'N Whack" style quilts. I used this technique on my ugly fabric challenge quilt several years ago (read about it here).
And a third type of fussy cutting is when you cut the fabric so that it fits together with the piece next to it to create the illusion of a continuous cut of fabric like I used for my End Game mini quilt. (That's what I'll be showing you in this tutorial!) Some people use this method with several colorways of the same fabric to create a quilt block where the design is all connected, but the pieces are different colors. It's a bit mind blowing!
Fussy cutting usually requires more fabric yardage than traditional cutting. Depending on the quilt design, you will need multiple repeats of the fabric design to accommodate the fussy cut pieces. The largest sections in the End Game mini quilt require a minimum of six repeats of the fabric design. For fabrics with a large repeat, this could mean a yard or more, even for a mini quilt.
To cut the first shape, lay the template onto a single layer of fabric, right side up. I like to center the template on a design. Keep in mind what the finished unit will look like and how many shapes it's made of, as that will help you decide what design you may want to fussy cut from the fabric or where you want to place your template.
Hold the template firmly in place, and use a rotary cutter (I'm using an Olfa rotary cutter) to cut around all sides. Be careful to not cut too far past the template, as you may need that nearby fabric for another piece.
Be sure to always keep the cut pieces oriented correctly. Turning this triangle would mean the next piece would be impossible to line up.
To help with this, I used flattened cardboard boxes to lay my pieces on as I cut so they were always kept in the correct positions. I could stack multiple boxes carefully on top of each other as I needed more space. (You could also use design boards or foam core board if you wanted.)
After cutting the first piece, carefully lay it on the fabric again, matching up the design exactly with another repeat of the design. It's hard to even see in this photo that the triangle is on top of the fabric!
Note: I am going to show how to cut the triangle that will go to the left of the first one. If I needed to cut a triangle to the right, then this spot would not work, as there is not enough fabric to the right of the triangle.
Place the template to the left of the first triangle (upside down orientation this time), overlapping the edges as shown. Two of the template corners should be on top of the original triangle. (Note: Use the same method if you need to cut a piece to the right or above or below. Just place the template in the position of the piece you need to cut, overlapping the edges of the template and triangle.)
Lining up the fabric and templates for this step is the most crucial step in ensuring the design will fit together when sewn. Take your time to make sure the first triangle is lined up exactly with the fabric design below it, and make sure the template fits exactly onto the two overlapped corners of the first triangle.
Firmly hold the template in place, and carefully remove the first triangle. Set it to the side so you won't accidentally cut it, but be careful not to rotate it.
Use a rotary cutter to cut around all sides of the template. Remember to not cut too far past the template.
Be sure to keep the pieces oriented correctly as you continue to cut additional pieces.
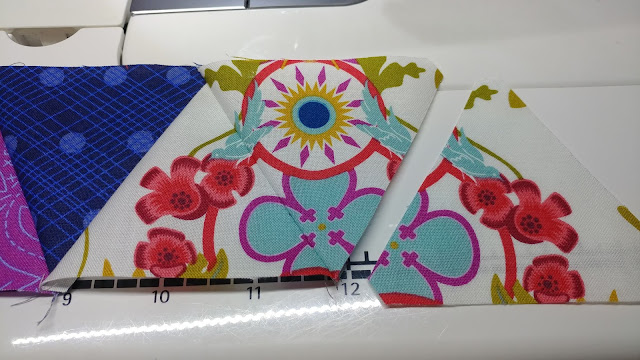
When set apart, the fabric designs don't appear to match, but when you overlap them, the design should look continuous.
Repeat these steps for any additional pieces that need cut from this same fabric. If you needed a piece to the right of these two (or below), then you would start with the same first triangle again. But if you needed a piece to the left of these two (or above), then you would start with the second triangle cut.
Repeat the process again for each fabric.
The fabric will become a bit like swiss cheese as you go!
Once all the pieces are cut, you're ready to sew! This is when you'll thank yourself for keeping all your pieces labeled and laid out nicely!
Start by laying the pieces right sides together just as you would any other piece.
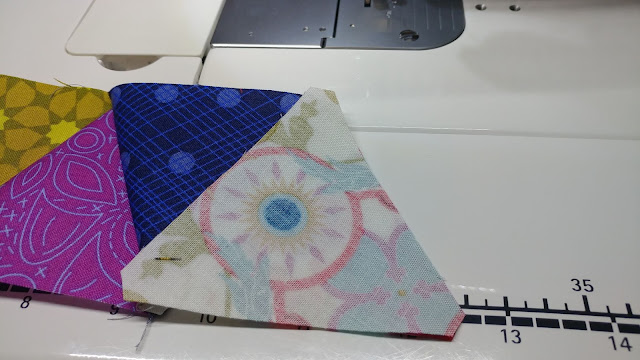
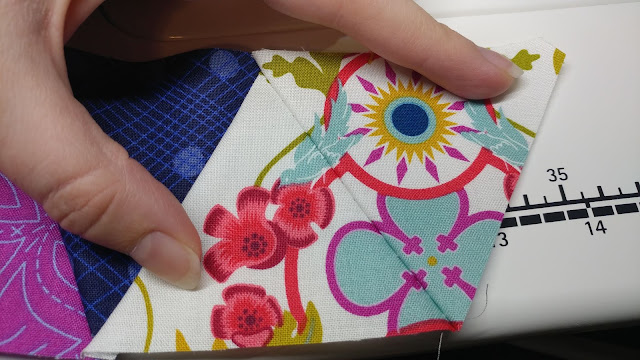
Fold back the fabric that will be in the seam allowance just 1/4" to see how the designs will match up. This is a good trick to see if you need to move the top piece up or down just the slightest bit. If your cutting was accurate, then there should just be very very slight adjustments made here.
Set your machine to a large stitch length or basting stitch. (This is so it's easier to remove the stitches if you need to start over.) (I'm using a Juki TL-2010Q and 50wt Aurifil thread #2605 Grey.)
Sew the pieces together with a 1/4" seam.
Open the pieces to check the alignment.
There are a few ways to fix misalignment. First, are the designs lined up vertically, or do you need to rip out the seam and start over? Second, if the designs are lined up, then maybe you just need to change the seam allowance ever so slightly. Would more or less of a seam look better? Third, does the whole seam need correction? Or would unpicking or restitching just a portion of the seam work?
In this example, I liked how the bottom flower lined up, but I decided that the leaf at the top and the bird needed a slightly bigger seam to really make them perfect.
Still using the basting stitch, I stitched about a needle width more than the 1/4" seam just at the top half of the triangle. Just a very slight adjustment.
I liked this result much better!
Once happy with the seam, change the stitch length back to a normal size and sew EXACTLY over the final basting stitches.
Marvel at your work! Pop open a bottle of champagne! Squeal with excitement! Do a happy dance!
Then do it again!
And again...
And again!
Be sure to keep Jack the Ripper close by. He's more friend than foe this time! (I use a Seam-Fix seam ripper by Dritz.)
And soon, you'll have a finish ready for sew and tell!
If you want to make your own End Game quilt, Be sure to get your pattern from Jemima's website. It includes the needed templates for making a large quilt and the mini quilt, but the acrylic templates make it even easier for fussy cutting!
Save this tutorial to Pinterest so you can refer to it when you need it!
So what is fussy cutting? Fussy cutting is when you cut the fabric in a way to cut around a design instead of cutting the pieces from strips or randomly. There are several types of fussy cutting.
One type of fussy cutting is to highlight an image from the fabric in the cut piece. This is often used when making I Spy quilts like these I made a few years ago (read more about them here and here).

A second type of fussy cutting is when identical pieces of fabric are cut to create kaleidoscope effect. This is used in "Stack 'N Whack" style quilts. I used this technique on my ugly fabric challenge quilt several years ago (read about it here).
And a third type of fussy cutting is when you cut the fabric so that it fits together with the piece next to it to create the illusion of a continuous cut of fabric like I used for my End Game mini quilt. (That's what I'll be showing you in this tutorial!) Some people use this method with several colorways of the same fabric to create a quilt block where the design is all connected, but the pieces are different colors. It's a bit mind blowing!
Fussy cutting usually requires more fabric yardage than traditional cutting. Depending on the quilt design, you will need multiple repeats of the fabric design to accommodate the fussy cut pieces. The largest sections in the End Game mini quilt require a minimum of six repeats of the fabric design. For fabrics with a large repeat, this could mean a yard or more, even for a mini quilt.
Step one: gather your fabrics and template. For my End Game mini quilt, I used the Seventy-Six fabric collection by Alison Glass.
Jemima's pattern includes the templates needed. This pattern uses triangles, so that is what I am showing in this tutorial. The process would be similar for any shape, but I am not covering those here.
Jemima's pattern includes the templates needed. This pattern uses triangles, so that is what I am showing in this tutorial. The process would be similar for any shape, but I am not covering those here.
To cut the first shape, lay the template onto a single layer of fabric, right side up. I like to center the template on a design. Keep in mind what the finished unit will look like and how many shapes it's made of, as that will help you decide what design you may want to fussy cut from the fabric or where you want to place your template.
Hold the template firmly in place, and use a rotary cutter (I'm using an Olfa rotary cutter) to cut around all sides. Be careful to not cut too far past the template, as you may need that nearby fabric for another piece.
Be sure to always keep the cut pieces oriented correctly. Turning this triangle would mean the next piece would be impossible to line up.
To help with this, I used flattened cardboard boxes to lay my pieces on as I cut so they were always kept in the correct positions. I could stack multiple boxes carefully on top of each other as I needed more space. (You could also use design boards or foam core board if you wanted.)
After cutting the first piece, carefully lay it on the fabric again, matching up the design exactly with another repeat of the design. It's hard to even see in this photo that the triangle is on top of the fabric!
Note: I am going to show how to cut the triangle that will go to the left of the first one. If I needed to cut a triangle to the right, then this spot would not work, as there is not enough fabric to the right of the triangle.
Lining up the fabric and templates for this step is the most crucial step in ensuring the design will fit together when sewn. Take your time to make sure the first triangle is lined up exactly with the fabric design below it, and make sure the template fits exactly onto the two overlapped corners of the first triangle.
Firmly hold the template in place, and carefully remove the first triangle. Set it to the side so you won't accidentally cut it, but be careful not to rotate it.
Use a rotary cutter to cut around all sides of the template. Remember to not cut too far past the template.
Be sure to keep the pieces oriented correctly as you continue to cut additional pieces.
When set apart, the fabric designs don't appear to match, but when you overlap them, the design should look continuous.
Repeat these steps for any additional pieces that need cut from this same fabric. If you needed a piece to the right of these two (or below), then you would start with the same first triangle again. But if you needed a piece to the left of these two (or above), then you would start with the second triangle cut.
Repeat the process again for each fabric.
The fabric will become a bit like swiss cheese as you go!
Start by laying the pieces right sides together just as you would any other piece.
Fold back the fabric that will be in the seam allowance just 1/4" to see how the designs will match up. This is a good trick to see if you need to move the top piece up or down just the slightest bit. If your cutting was accurate, then there should just be very very slight adjustments made here.
Set your machine to a large stitch length or basting stitch. (This is so it's easier to remove the stitches if you need to start over.) (I'm using a Juki TL-2010Q and 50wt Aurifil thread #2605 Grey.)
Sew the pieces together with a 1/4" seam.
Open the pieces to check the alignment.
There are a few ways to fix misalignment. First, are the designs lined up vertically, or do you need to rip out the seam and start over? Second, if the designs are lined up, then maybe you just need to change the seam allowance ever so slightly. Would more or less of a seam look better? Third, does the whole seam need correction? Or would unpicking or restitching just a portion of the seam work?
In this example, I liked how the bottom flower lined up, but I decided that the leaf at the top and the bird needed a slightly bigger seam to really make them perfect.
Still using the basting stitch, I stitched about a needle width more than the 1/4" seam just at the top half of the triangle. Just a very slight adjustment.
I liked this result much better!
Once happy with the seam, change the stitch length back to a normal size and sew EXACTLY over the final basting stitches.
Marvel at your work! Pop open a bottle of champagne! Squeal with excitement! Do a happy dance!
Then do it again!
And again...
And again!
Be sure to keep Jack the Ripper close by. He's more friend than foe this time! (I use a Seam-Fix seam ripper by Dritz.)
Patience is really key for this! This isn't something to do when you're in a hurry to finish. This is something to take your time on and really be proud of!
And soon, you'll have a finish ready for sew and tell!
Save this tutorial to Pinterest so you can refer to it when you need it!
This post contains affiliate links. Clicking a link will NOT affect the purchase price.
__________
If you liked this post, you may also like these:


Kathy R.
ReplyDeleteThank you for the tutorial. I will be sure to reread it, to fully understand the process. Your explanation and pictures are great.
petuniakr@aol.com
Great tutorial! I love fussy cutting - and the swiss cheese fabric that is left over.
ReplyDeleteGreat job on the quilt and the tutorial!
ReplyDelete