It's week 4 of the Exploding Heart quilt along! Last week, we finished sewing and trimming all the blocks, and this week we'll begin sewing the blocks into rows! Be sure to watch the video at the end of the post and enter this week's giveaway!
If you're just joining in, be sure to check out all of the quilt along blog posts:
This post contains affiliate links. If you make a purchase after clicking the links, I may receive a small commission at no extra cost to you. As an Amazon Associate I earn from qualifying purchases.
If you're new here, hello! I'm Laura! I design quilt patterns , and I'm a self-proclaimed deal hunter! Be sure to join the popular Quilting & Sewing Deals Facebook group where I post sales, deals, and coupon codes from all around the web!
**The QAL has ended, but be sure to sign up if you want to be notified about the next QAL!
Week 4 / 6
This week we will sew the blocks into rows. The directions for this begin on page 8 of the pattern.
If you don't yet have the pattern, you can purchase the PDF version here.
You can also get a paper version that will be mailed to you.
Be sure to scroll down past the tips to watch this week's video and enter the giveaway!
I use a large table (like my dining room table), countertop, the floor, or design wall to lay out the blocks before sewing them into rows. I use a flannel-backed tablecloth held up with painter's tape or push pins for a design wall. It works great!
I lay out about three rows at a time just so none of the same fabrics are touching. This is just my personal preference and attempt at being fairly random. Don't spend too much time placing the blocks. It's meant to be mixed up!
Once I have a few rows laid out, I use a numbered pin in the first block of each row to mark which row is which. ( These on Amazon are a great option. You can use pins and numbered paper too!) Then I can stack the blocks in order and take them to the sewing machine.
You may have pressed your block seams open or pressed them to the side (either way is perfectly fine!). When sewing the blocks together, you might be sewing through several layers of fabric. Sew slowly and your machine should be able to do it just fine.
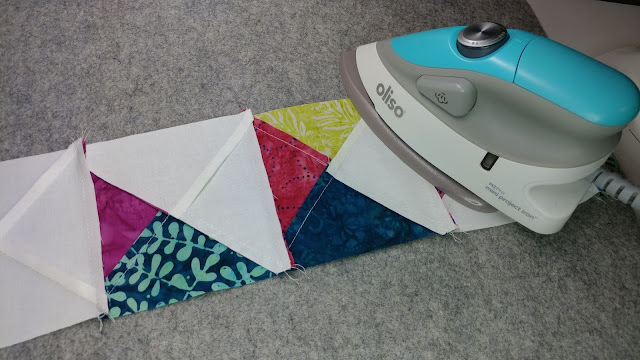
I like to press the seams in the odd numbered rows to the left and the seams in the even numbered rows to the right. This helps the seams to nest when sewing the rows together. If you prefer to press the seams open, go for it! (I'm using a turquoise Oliso mini iron and wool pressing mat .)
Once you've sewn all the rows and pressed the seams, you've finished this week's homework!
If you just can't wait to finish your quilt and want to sew the rows together, do it! You can finish early! Just remember to come back each week and enter the giveaways! You definitely don't want to miss them!!
Video
Check out this week's quick video!
**If the video doesn't load, you can watch it here: https://youtu.be/tc9eNLGxefo .
Homework
- Sew the blocks into rows. Refer to pages 8-9 of the pattern.
- Share a photo of your rows all laid out so we can see how your quilt looks so far! Use #explodingheartQAL in the caption of your photo on Facebook or Instagram. On Facebook, you can share on your personal timeline, or you can share in a quilting group you're in! If the post is "public," then others sewing along will be able to find it and encourage you!
- Search for #explodingheartQAL on Facebook or Instagram, and like and comment on at least three posts to encourage others that are sewing along!
- Enter this week's giveaway at the end of this post!
QAL Schedule
Next week, I'll be sharing tips for sewing the rows into the quilt top!
Giveaway
Now for this week's giveaway! There will be a giveaway every week of the quilt along! This week's sponsor is the Canadian quilt shop Keystone Modern Creative who is giving away a $25 gift card to their shop!
Let's all quilt along!
__________
If you liked this post, you may also like these:
Disclaimer: Giveaway is in no way sponsored, administered, or associated with Blogger. By entering, entrants confirm they are eligible to win. No purchase necessary to win. Open to US residents aged 18+. Giveaway starts at 12:00am CST January 27, 2021 and ends at 12:00am CST on February 4, 2021. One winner will receive a $25 gift card. Odds of winning determined by number of eligible entries received. How to enter: complete a task on the Rafflecopter widget. Winner will be chosen by Rafflecopter on February 5, 2021 from all eligible entries and notified by email. If winner cannot be reached via email or prize is unclaimed after three days, a new winner will be chosen by Rafflecopter. Winner is responsible for paying any taxes related to the prize. By entering this giveaway, you release Slice of Pi Quilts from any liability whatsoever. Void where prohibited by law.


This is such a cute project!
ReplyDeleteI also use Oliso iron but the full size iron. I keep looking at the mini Oliso, but I just have not made the purchase yet.
ReplyDeleteI'm about a week or so behind. Still stitching blocks together and pressing the seams. Hope to get the trimming finished soon.
ReplyDeleteI'm using a mini oliso as well.
ReplyDeleteComing along great!! Love all the tips along the way too!
ReplyDeleteI was having so much fun with this pattern, I finished the entire top! ��
ReplyDeleteI selected a beautiful bright peacock blue minky for the back and it is currently waiting patiently at my LQS for longarming!
Finished the top. This was a fun one to put together. I made mine scrappy so I just grabbed the block on top of the stack and sewed it into place. If 2 of the same touch, they touch! I think it turned out great!!
ReplyDeleteI couldn’t wait so I’m now done. So thrilled with it!
ReplyDeleteI have an Oliso Pro iron.
ReplyDeleteI found a pressing stick to be really helpful when pressing the seams open.
ReplyDeleteI'm still soooo behind!!
ReplyDeleteI am too! I'm still sewing my blocks! We'll get it done though and it'll be beautiful!
DeleteUsing my big clunky Sunbeam iron and looking at a mini olio !
ReplyDeleteSee much fun. Got my pattern late so I’m on week two. Using my scraps!!!!!!
ReplyDeleteI've just started sewing my rows. What a fun quilt!
ReplyDeletePressing my seams to the side except for very last seams which I'm pressing open
ReplyDeleteUsing a black and decker!
ReplyDeleteI love this pattern!
ReplyDeleteI would love to have a olio but I can’t justify it when my iron still works.
ReplyDeleteI haven’t even started sewing yet, however when I do start pressing it will be with my olisio iron( full size) and my wool mat, I love the wool mats!
ReplyDeleteI don’t see the video, am I in the right area?
ReplyDeleteI have loved seeing all the color combos come together. It is so much fun! Already planning out my next one! Thank you for hosting this QAL!
ReplyDeleteA Sunbeam from Costco.
ReplyDeleteI have a Sunbeam from Costco. Great iron! Nice and hot and if wanted lots of stream.
ReplyDeleteI have a Oliso iron, which I love! It's pink. Which I love even more, lol.
ReplyDeleteI use an older steam iron by Sunbeam. I rarely use steam and usually sprinkle with water prior to ironing if I feel it is necessary. Love the exploding heart pattern. Nadine Willis
ReplyDeleternwillis@velotech.net
I use a cheap iron I got from Dollar General.
ReplyDeleteThis comment has been removed by the author.
ReplyDeleteI bought a Black and Decker a few months ago and it's pretty good! I hope for an Oliso in my future as it seems to be the iron of choice and I do a LOT of ironing!
ReplyDeleteBtw, the blog posts are most helpful! I am a little behind and am just starting to piece my blocks. I was a little confused on block B and how the HST was a different size than the background block. Now I can run through them quickly!
Oliso!
ReplyDeleteI’m using a regular old iron. I don’t even remember what kind it is. Black and Decker maybe?
ReplyDeleteI'm sewing blocks into rows. I would like to watch the video but can access it. Is it in another location?
ReplyDeleteI used a black and decker iron that I got at Walmart for all my ironing.
ReplyDeleteI still have blocks to make, but I hope to catch up this week.
ReplyDeleteAlmost all caught up!! Can’t wait to setup rows on my wall!!
ReplyDeleteStarting to put my rows together!!! I use several irons - A Shark, A Black and Decker - I have a cute Panasonic cordless that is my fav!!!
ReplyDeleteI'm a little behind. Just laying out my blocks on the design wall I've constructed from PVC pipe and a flannel sheet!
ReplyDelete