Some quilts are just fabric and thread, but some quilts have stories sewn into every stitch. This is one of those quilts.
This quilt started back in 2017. A group of my quilty friends spent the weekend at a sewing retreat. (You can read all about that HERE!) We decided a few weeks before the retreat that we would each make a set of friendship stars, then we would trade at the retreat so we would each have one from each friend to make into a quilt. It was a lovely idea. The reality was that everyone used completely different colors and styles of fabrics, so none of them went together at all. It was an immediate UFO.
Fast forward to just a couple months ago. Bobbie of The Geeky Bobbin challenged other quilt bloggers to sign up for UFOvember to share and finish a UFO. I have quite my share of UFOs! (I bet I could find at least two dozen if I tried!) When Bobbie set up the blog hop, she asked for people to either Resume, Rework, or Rehome their UFO. This immediately reminded me of these friendship stars from 2017. I knew now was the time.
This post contains affiliate links. As an Amazon Associate I earn from qualifying purchases.
If you're new here, hello! I'm Laura! I design quilt patterns, and I'm a self-proclaimed deal hunter! Be sure to join the popular Quilting & Sewing Deals Facebook group where I post sales, deals, and coupon codes from all around the web!
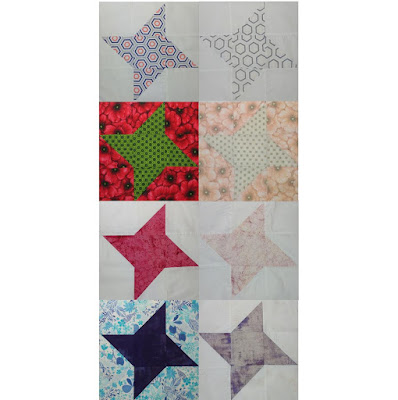
I pulled out the blocks from their hiding place and took assessment. There were seven blocks, all 12 1/2" square. Three had solid white background fabric. Two were mostly purple. One was quite Christmas-y with saturated red and green. One was made with batik fabric. It was quite a hodge podge.
Scrappy quilts of random mismatched fabrics aren't really my thing. I needed something that would bring these all together so it looked like they belonged together. And that's when the "rework" prompt of the UFOvember challenge sparked an idea.
I went down a rabbit hole of internet searching to learn about bleaching fabric. I wondered if I might be able to lighten the darkest colors so they would become more neutral in color. And I learned that this was indeed possible.
I grabbed a plastic tub from the garage and a bottle of bleach and headed for the bathtub. (I should add that was 1,000% an experiment. I have never done anything like this, I had no idea if it would work, and I made everything up as I went. Oh, and I was not sentimentally attached to these blocks at all. If they ended up in the trash, I was okay with that.)
I put about an inch of water in the plastic tub, then added a couple pours of bleach. Maybe it was a 1:4 ratio? Maybe 1:8? I'm a terrible scientist.
I fully expected an immediate color change, but that didn't happen. So I let them all soak for about 45 minutes. I took out three at this point and rinsed them in water.
Then one more after 2.5 hours.
The purple ones came out after 5 hours.
The final one had no visual change, so I left it to soak overnight.
After about 12 hours in the bleach water, there was still no change to the maroon fabric. According to Google, you must neutralize the bleach in the fabric afterwards so it doesn't continue to break down the fabric. So I made a water/hydrogen peroxide bath (I aimed for a 1:10 ratio, though I just guessed) and let them soak for a few minutes. I again rinsed all the blocks by hand, then ran them through a warm rinse in the washing machine. Once done, I trimmed away any frayed threads and pressed them to dry them.
**Pat Sloan messaged me to say she used to teach a class on bleaching and dyeing fabrics. I asked her if she neutralized the bleach afterwards or if any of the fabric disintegrated after bleaching it, and she said, "Nope! Just bleach, then rinse." She said she has quilts with bleached fabric from 20 years ago that are still fine!
Here are the results of the bleaching.
I'm fascinated by the whole thing! I was aiming to create neutral colors, but I can see how this would be a really cool technique for creating just subtle shade differences too!
But that one block. Sigh. The maroon fabric didn't change AT ALL! I'm guessing it's a vintage fabric that might be polyester or a poly blend of some kind. So now I had a whole bunch of blocks that did seem cohesive - but with one maroon star.
My next thought was to dye all the blocks maroon in order to get them to match the star. Again, totally uncharted waters for me. I've never dyed anything. My local store did not have maroon dye, so I thought I could mix the colors they did have to get close. The internet said it was possible!
I thoroughly read the directions on the dye package - at least five times - and waited until the kids were in bed. Hot water in stainless steel container, add package of dye, add salt, add fabric, stir for 15 minutes, then let soak for 45 minutes. Rinse and wash. I could do this!
I added one spoonful of red dye to the water in the sink, and it was instantly blood red. (Not pink like the internet said it would be.) I added half the package of red dye, thinking that would leave me another half if I needed to start over. Then I added a sprinkle of the turquoise dye. The internet said this would be maroon, but it was definitely purple. I added a bit more turquoise. Nope, just deeper purple. A tad more? Nope. Now royal purple. I dumped in the rest of the red to try and get back to a reddish purple. Then I just shrugged my shoulders and said this is the color it has to be!
I put the first block in - thinking this would be a 15 minute + 45 minute process. It instantly turned purple. Not slow like the bleach, but INSTANTLY a dark purple. Too dark? Maybe. I thought I'd just rinse it out and see. Nope. It didn't rinse out. Well, this was the color it was going to be! I definitely wish I would have taken it out sooner. Both of the fabrics took on the dye, making them almost identical and losing the friendship star design.
I decided I would dunk the rest of the blocks much quicker - just long enough for the fabric to become completely wet. In hindsight, I wish I would have left a few of the blocks in a bit longer, but in the moment, I definitely wasn't thinking about that.
I was noticing that my "stainless" steel sink was truly turning purple and not wiping off. I wanted to hurry to get the water out before this reached a point I couldn't un-do. I reached for the sink stopper, but the addition of hot water must have caused it to stick extra hard. In the moment of panic, I could not think of the other 527 ways that would be better than just pulling on it harder. But I did get it unstuck. Which splattered me and my whole kitchen in purple dye. I frantically wiped down the counters and cabinets and floor and stove and wall... Then I realized I had purple dye on my face, in my hair, and all over my arms up to my shirt sleeves.
Good news though! All of the blocks were a shade of purple, and the only thing with lingering purple stains were my fingers.
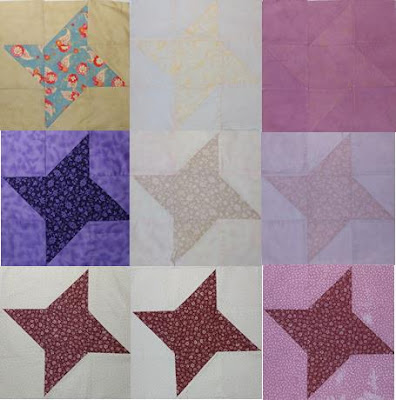
I dropped the blocks into the washing machine for a warm rinse. Then I took them out, pressed them to dry them, and trimmed away any frayed threads. The results of this were equally as fascinating!
The block I dyed first is by far the darkest of the blocks and has very little difference between the background and star fabrics. The block that was originally red and green did not take much dye in the short dunk it got, so I wish I would have let it soak a bit longer. And that maroon star. I'm sure it was user error in my haste, but it has a few spots that did not dye evenly. Sigh.
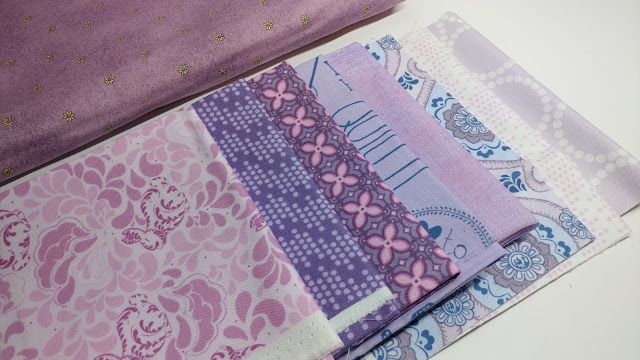
But now all the uncharted waters had passed. I could switch my brain into focusing on quilt making! I hunted through my stash for fabrics that would work well with my blocks now that they were a bit more cohesive, and I found a bundle of Sew It, Quilt It, Love It fabric designed by Amy Hamberlin for Henry Glass Co. The purples in the collection were perfect for tying all of my blocks together! I even found a couple other prints in my stash that fit right in, and a big piece of yardage from my vintage Debbie Mumm fabric tote!
I had seven blocks, so I decided to make a 16 block quilt and alternate the friendship star blocks with 36-patch blocks. (And make one extra friendship star block!)
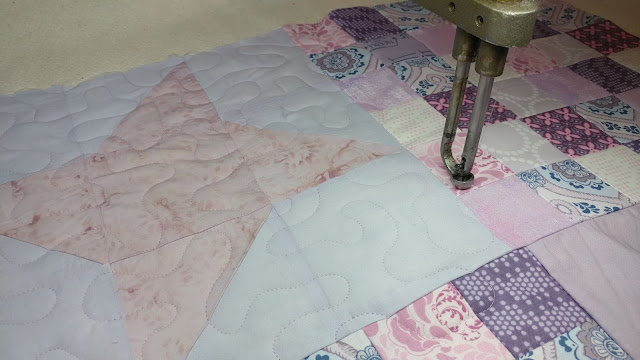
I loaded the quilt on the longarm and grabbed my cone of 50wt Aurifil #2510 Light Lilac. It was such a perfect color for my now all purple quilt! (I used it to piece the 36-patch blocks too!)
I used Warm & Natural batting, and figured it was fitting to use two pieces of leftover batting. I just butt the two factory edges up to each other and quilt.
I used my go-to all-over free-motion design - meander. I did it a bit smaller than my usual jumbo size. I'd say this is a good medium sized meander.
Kramer (my 1989 Gammill longarm) made quick work of the quilting! It took less than an hour to quilt the 48" square quilt.
I found a 1/2 yard of Island Batik fabric that was a light purple/lavender color in my stash, and thought it would be perfect for binding. A couple laps around the edge, and the quilt was done! (Machine binding tutorial HERE.)
This was the extra friendship block that I sewed. I fussy cut the fabric for the center of the star, and thought it was perfect for this friendship quilt made with the help of my quilty friends!
I did remember to sew my label into the binding!
I realized after taking a few pictures that it's very hard to get the true color to show up in the photos! This one below (taken on my driveway) is very close to the real-life colors.
I absolutely love the story behind the seams of this quilt! In the end, it feels like all the "accidents" and "make-it-work moments" were all meant to be.
What a fun adventure it was! This quilt will definitely be getting added to my "Try Something New!" trunk show!
Check out all the other bloggers on the UFOvember blog hop! I can't wait to see if the "rework" prompt inspired anybody else to try new things!
November 15 - Jessica at Desert Bloom Quilting
November 19 - Cinzia at Cinzia White Designs
November 29 - Kim at Line Design
__________
If you liked this post, you may also like these:


That sounds like it was quite the adventure! It was such a clever way to force the disparate blocks to be cohesive. And now you have a quilt you can enjoy rather than a bunch of blocks to feel bad about. I love it!
ReplyDeleteWonderful story of friendship, experimentation and a wonderful finish. Fabric dyeing is wonderful and messy, no two ways about it. But it is rewarding! It was interesting to see how much change there was in some of the blocks.
ReplyDeleteReally enjoyed your adventure! Such a wonderful memory of times spent together while trying something new.
ReplyDeleteBet you have never worked so hard on an UFO and will never work so hard on an UFO in the future. Admire your perseverance.
ReplyDeleteWow! What a clever idea of yours. I would have never thought of that. Thanks so much for sharing and keeping track of your adventure!
ReplyDeleteWell, bleaching and over-dying would never have occurred to me but it sounds like fun and I love the results! Thanks for taking us step-by-step into your process!
ReplyDeleteWhat a great experiment. Thanks for sharing the story. It turned out great!
ReplyDeleteQuite the adventure! I love that you got something you liked from all your playing and experimenting! It is truly remarkable the difference between the bleach taking so long and the dying taking such a short time. So interesting, although I am glad it was you and not me!
ReplyDelete