This post contains affiliate links. If you make a purchase after clicking the links, I may receive a small commission at no extra cost to you. As an Amazon Associate I earn from qualifying purchases.
If you're new here, hello! I'm Laura! I design quilt patterns, and I'm a self-proclaimed deal hunter! Be sure to join the popular Quilting & Sewing Deals Facebook group where I post sales, deals, and coupon codes from all around the web!
It all started with the new California Beaches panels designed by Anderson Design Group for Riley Blake Designs. My friend (also named Laura!) lives on the beach in California, so I thought of her as soon as I saw the panel! (The panel is arriving in stores now. I was able to find it here!)
The fabric for this post was provided by Riley Blake Designs as part of the blog tour for the Destinations fabric panels. The project and opinions are my own.
I'm not one to make traditional quilts, and I struggled with an idea for using the panel. The panel features eight different beaches, and each one measures about 12" x 14". Although just adding sashing to them would make a great quilt, I really wanted to do something outside the box.
After weeks of brainstorming, I finally had it! I would use the panels as the scenes inside letters like a vintage postcard!
I started by finding an image of a vintage California postcard, then I enlarged it so the letters were about 10" tall.
I cut rectangles of Lite Steam-A-Seam 2 the size of each letter, then pressed them to the back of the panel (with my Oliso mini!). I used my light pad to make sure I placed them where I wanted them, then traced each letter onto the paper of the fusible. A couple of the scenes had to have two letters each, so I was careful to choose letters that wouldn't be next to each other in the final word.
After cutting them out, I fused them to solid white fabric. (All solid fabrics are Riley Blake Confetti Cottons).
I then cut the letters out again, this time about 1/4" away from edge of the scenic letters. And this is when I made my first mistake. I *should* have used fusible on the back of the white fabric, but didn't. This meant the white fabric began to fray as I worked with it.
I positioned all the letters onto solid navy fabric, then stitched them using 50wt Aurifil #2024 White. I used a straight stitch just inside the raw edge. Then I cut around the letters again, creating the block letter illusion with how I cut the navy fabric. Doesn't it really pop on the solid scuba color? I used the same color on the back too! Which also looks completely different in different lighting! I promise all the photos on this post are the same fabric! Just sometimes in the sunshine and sometimes in my basement sewing studio!
Next, I enlarged, traced, and cut out the "greetings from" section of the postcard. First onto solid white fabric with fusible on the back, then pressed to the navy solid (with no fusible on the back of that). I could have used my Cricut for this step, but chose to use scissors so that I could work on it during homeschool time. In hindsight, adding fusible to the solid navy would have been a great idea!
With these pieces complete, it was time to make a sandwich! A quilt sandwich!
I chose Hobbs Tuscany wool batting primarily because of it's anti-wrinkle qualities. I knew I would be mailing this quilt in a box to California, and wool batting does not retain wrinkles like cotton batting. Wool would give the quilt the best chance of being wrinkle free when it arrived in California.
I pin basted the quilt to prepare it for quilting on my domestic machine (a Juki TL-2010Q).
Next up: thread auditions! I knew I would use 50wt Aurifil #2784 Dark Navy to applique down the word pieces, as it is the darkest blue I have in my thread stash! But I have lots of different shades of aqua, so I auditioned several before picking 50wt #1148 Light Jade. (That's my favorite of all the Aurifil colors!)
I used my free-motion foot to stitch down all the word pieces, staying about 1/8" away from the raw edge.
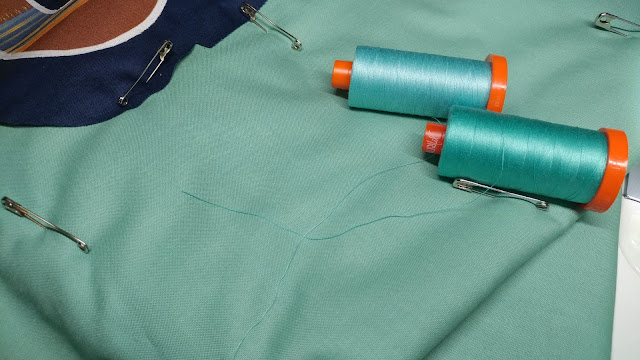
Then I noticed this.
Some of the scenic letters had started to come up. Normally, I'd just press them down again, but since I had used wool batting, pressing was not an option. (High heat causes the wool to shrink!) I really hadn't wanted to stitch on the scenic letters, as I did not want to detract from them. I knew my only hope was clear Aurifil monofilament thread. I have not used it much, so it took a bit of trial and error to get it to do what I wanted. My biggest takeaway: it likes to be stitched using turtle speed.
The monofilament worked just as I had hoped. The letters were secure, but the stitching didn't take away from the design at all. After finishing the applique, it was time to free-motion!
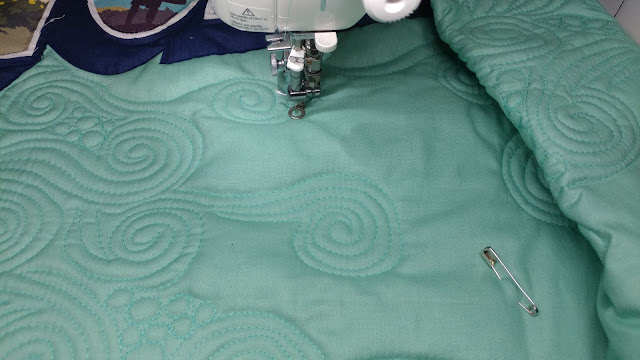
Waves and pebbles seemed like an appropriate design! I have to be honest, as I started stitching this, I completely surprised myself! I had to stop and admire it several times, because I was so shocked that I was actually quilting this! Total proof that practice makes progress!
Of course I see imperfections (lots of them!!), but progress is what's important. Not perfection. There are no quilt police here! Only cheerleaders!
I trimmed away the extra batting and backing and machine bound the quilt. (Tutorial for that HERE.) The finished quilt measures about 30" x 40".
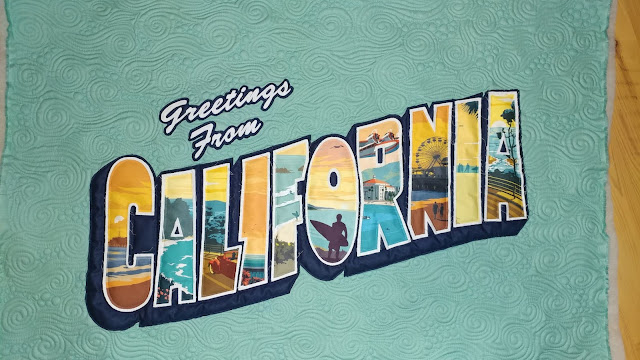
As I trimmed away the extra threads, I couldn't help but love the texture on the back!
Okay, the front too!
I even remembered to sew one of my EverEmblem labels into the binding!
After a few close-up photos, I packed it up to send to my friend in California!
It's always so nerve wracking to mail a quilt!
Luckily, it arrived earlier than expected and in perfect condition!
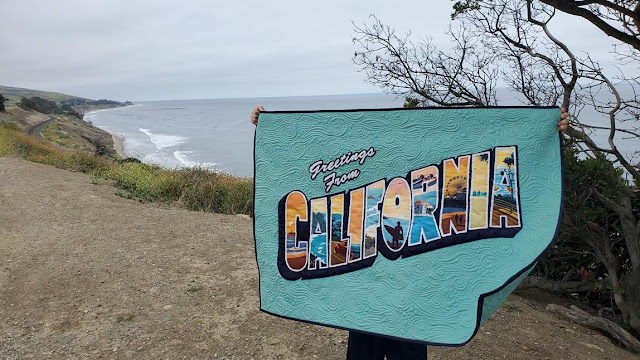
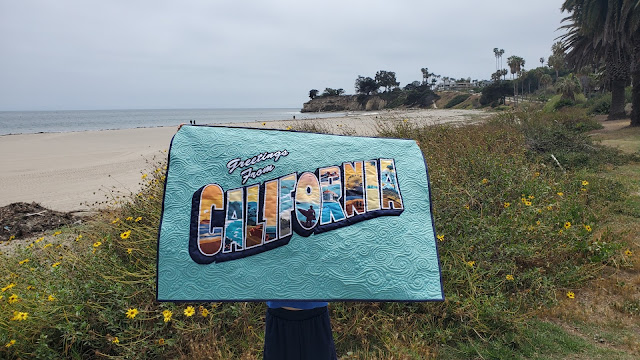
Then my friend and her sons took the quilt on a photo shoot at the beach!
It's like my quilt went on a vacation without me and sent me a postcard!
It's saying, "Wish you were here!"
I'm so happy with how this quilt turned out! I learned a lot as I made it, which is always a goal of mine when I try something new!
This was such a fun way to use the California Beaches panel from Riley Blake!
Have you made anything with a Destinations panel yet? They have them for lots of National Parks and tourist spots. This definitely won't be the only one I make!
I'm hosting TGIFF! Share a link to what you finished this week so we can celebrate with you!
__________
If you liked this post, you may also like these:









You nailed it. What an awesome quilt. Great idea to cut up the smaller pieces of this fun panel. I'm totally inspired with your #CreativeGoodness
ReplyDeleteGreat use of the panels! I love those postcards...I don't think people send them as often as they once did (before the pandemic). Maybe we will start seeing them again as people are so excited to get out and about!
ReplyDeleteI LOVE IT!! I'm going to have to check to see if there are panels I can use to do this ( in other words, I'm 'stealing' this idea because it's so GREAT!!)
ReplyDeleteReally clever idea....what are you going to do with the 'scraps' from the cut out panels? I live in CA myself by the beach and will have to look for that panel. Thanks for the great idea!!
ReplyDeleteWow, your quilt is absolutely fabulous. What a great way to use the panel!!!
ReplyDeleteNot in my wildest dreams would I have come up with an idea this great. Totally awesome and your narrative about the steps you used was great. I've had fusible not stay (come unstuck) and it is totally frustrating. I read somewhere that sometimes if we fuse too long or with too hot an iron, it can melt the fusible all the way off. I think that's happened to me. I'll be looking for some of these panels as I remember camping up and down the coast of California as a kid. Also into Oregon and Washington.
ReplyDeleteWow this is is a great quilt! I love the Idea of cutting letters but I would probably have stopped at that. The solid white and navy add a dimension to the letters I would not have thought
ReplyDeleteThat is one groovy quilt..... very well done!!
ReplyDeletereally awesome quilt and an ingenius way to get it done.
ReplyDeleteLove this piece!
ReplyDeleteWhat a cool way to use those panels! I never would have thought of that! I love your quilting, too, but then you probably knew I would :)
ReplyDeleteAwesome quilt! Such a creative idea.
ReplyDeleteI love this quilt and want to make one. This is probably a dumb question, but here goes...I think I understand that you used some kind of fusible material on the back of the letters. I didn't catch what that was. could you tell me again? Also I noticed some fraying on the letters and the white backing. Will that resolve it's self? or will it continue just as part of the style?
ReplyDeletethanks so much for sharing your talents!
Robin
Yes, I used Lite Steam-A-Seam II on the back of the letters. I forgot to use it on the white fabric, so that's why it is fraying. In hindsight, I definitely would have used a fusible on all layers of the letters. A similar product like Heat-N-Bond Lite, Wonder Under, or Mistyfuse would work great as well.
DeleteWow, that is super creative and it came out beautifully!
ReplyDelete