This post contains affiliate links. As an Amazon Associate I earn from qualifying purchases.
If you're new here, hello! I'm Laura! I design quilt patterns, and I'm a self-proclaimed deal hunter! Be sure to join the popular Quilting & Sewing Deals Facebook group where I post sales, deals, and coupon codes from all around the web!
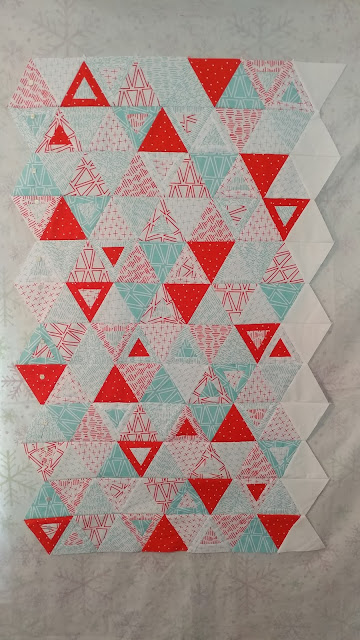
I drew up a design on the computer. I wanted to emphasize the triangles in the fabric, so I came up with an equilateral triangle quilt with scattered paper pieced blocks that feature a triangle inside a triangle. One side was left "rough," and the other side "smooth." I aimed to represent the internal tension within an artist between chaos and order, over-stimulation and focus, unfinished and finished.
After finalizing the design, I knew if I stuck with just the fat eighths, I'd be micro-piecing 1" triangles. Not what I had in mind! I wanted to make a quilt in a size that would be more useful than a mini, so I decided to aim for a crib size.
I began to hunt for more of the challenge fabric (Creative Rockstar by Rad & Happy for Riley Blake Designs). Unfortunately, I could not find any locally. Once I found the fabric online, I bought enough to keep some in my stash too. I mean, can one have enough red and aqua fabric?!
For the solid white fabric, I purchased Riley Blake Confetti Cottons in Cloud. It is not a pure white, but a tad more of an off-white. I stuck with it for the challenge, but I'll switch to a more pure white next time. Even though the color wasn't exactly what I was hoping for, the feel (or hand) of the Confetti Cotton fabric was lovely! The weight of the fabric is heavier than most cotton fabric, and it feels velvety soft. It's a very high quality solid, and I'd love to be able to find more colors more easily.
I drew up the paper pieced templates on the computer and printed them on regular printer paper. The triangles are 4" tall (finished). I used the same template to cut the regular triangles that didn't need to be paper pieced.
I chain pieced when paper piecing to try and make quick work of all 48 triangles.
I have a temporary design wall (it's actually a felt backed table cloth) that I can pin up on the wall when I need it. I arranged all the triangles using my original design as a guide. I've started using numbered pins (I put tiny numbers on the plastic heads of my pins) to help keep the rows organized when I sew. I just stick the pin in the first block of each row. Then I can easily keep track of which row is which, and which end is which, as I add blocks. I like to try and chain piece as much as possible, so this really helps me stay organized.
Once the top was together, I made a quilt sandwich with the main Creative Rockstar print as the backing fabric. I used 80/20 cotton batting and pin basted. (Does anybody else use every room in their house when making a quilt??)
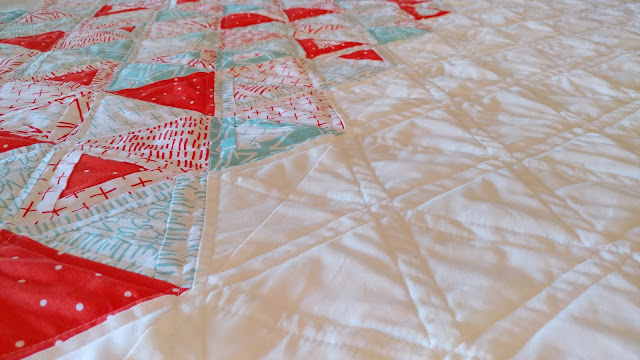
Before starting the quilting, I used a Hera marker to extend the seam lines into the white fabric so I could quilt the same design in the open space.
I used the walking foot on my Juki TL-2010Q to stitch 1/4" on either side of each seam. I'm still getting to know my Juki, and I'm not very happy with the walking foot. It squeaks where the arm goes over the needle set screw. I've added a lubricant, which really does help, but it's still wearing off the metal there. This is just the second quilt I've made with it, and it's causing real damage to the set screw. I'm hoping my local Juki dealer will have a solution!
After quilting, I trimmed up the edges and cut straight of grain binding from the Confetti Cotton Cloud fabric.
I've never bound inside angles before (yay for trying new things!), so I watched a YouTube video and made a couple practice runs before starting on the real thing.
I don't feel I was very successful with the inside angles, but the stitching did catch on the back when I stitched in the ditch to machine stitch the binding down. So that's a partial win! I definitely want to try it again! I think I'll try bias binding next time just to see if it allows a little more wiggle room.
I'm also quite happy with how closely the final quilt resembles my original design! The quilt has a nice crinkled look to it - it's just begging for some snuggles!
I submitted my quilt for the challenge earlier today. Now I just wait to hear the results (winners announced sometime in May)! There are some fantastic quilts under the #mqgfabricchallenge on Instagram!
40" x 48"
Fabrics are "Creative Rockstar" by Rad & Happy for Riley Blake Designs and Confetti Cottons Cloud by Riley Blake Designs
Batting is Fairfield 80/20 cotton
Thread is a mixture of Aurifil 2021 Natural White and Aurifil 2024 White (I had to mix in order to have enough!)
This is my 14th quilt finish for the year!

Linking up with Let's Bee Social at Sew Fresh Quilts, Finish It Up Friday at Crazy Mom Quilts, Can I Get a Whoop Whoop? at Confessions of a Fabric Addict, Finished or Not Friday and TGIFF at Busy Hands Quilts, Needle and Thread Thursday at My Quilt Infatuation, and Show Off Saturday at Sew Can She.
__________
If you liked this post, you may also like these:


What a pleasing design and I love the triangle edges. That is a hard binding to do; I believe the rule is to stop at the 1/4" mark in the point, fold to line up the raw edge with the next edge you are going to sew, and then fold the strip back down. I did this a long time ago and have helped people in the past, but not lately. Always good to try something new.
ReplyDeleteGorgeous! quilt! I love the Creative Rockstar collection, subtle yet modern and beautiful. The binding looks really tough ... I've been afraid to try, but I think you did a great job. Did you use bias binding or straight binding?
ReplyDeleteWhat a fantastic finish! It's a winner in my book. I had to laugh out loud when you asked if anyone else used every room in the house when they make a quilt. Maybe not every room, but I definitely use three rooms, my sewing room, dining room, and living room each have a part in the process. You did a fantastic job on aligning all of those triangles.
ReplyDeleteI was just reading something earlier about someone having trouble with their Juki foot. I had to go back and look for the blog but it is here if you want to connect with her and see if you are having the same issues.
ReplyDeletehttps://somethingrosemade14.blogspot.com/2017/04/saturday-night-sighs.html
Thanks Paula, Laura connected with me.
DeleteGreat design!!! I love how the backing carries out the theme. I love this color combo, too.
ReplyDeleteAnother great quilt, I love aqua and red also. I think you're going to like the using Janome Walking Foot with your Juki.
ReplyDeleteI really enjoyed watching your progress on Instagram, and this is a great post explaining your design process with the quilt. Inside angles are tricky, and I think it looks great. Bias binding will probably help a lot in your next version. Beautiful finish!
ReplyDeleteThis is a great quilt.I really like the triangles within a triangle.
ReplyDeleteYou did a nice job on the binding - I don't think I could've done those angles that well! Your design is so interesting and I love that you stretched that fat eighth bundle into a baby size quilt!
ReplyDeleteI'm loving this quilt so so much! I really enjoyed reading about your process all the way from design to finished quilt. My favorite parts are the combination of pieced and solid blocks in the colored area, and that you continued the quilting design in the negative space. Thanks for sharing!
ReplyDeleteThat's a great design and such inventive edge treatment! You really made the best use of the fabrics. Thanks for sharing the process!
ReplyDelete